15-494/694 Cognitive Robotics: Lab 3
I. Software Update and Initial Setup
- At the beginning of every lab you should update your copy of
vex-aim-tools. Do this:
$ cd vex-aim-tools
$ git pull
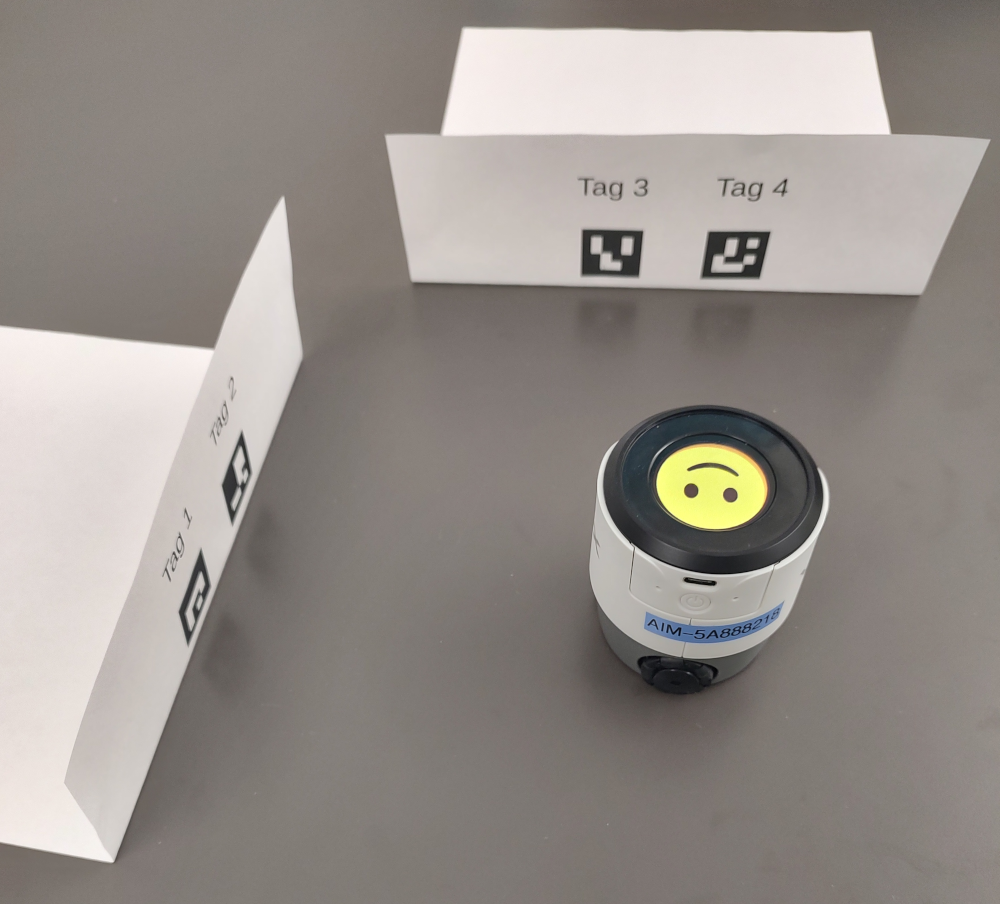
- For this lab you will need a robot, an orange barrel, and some
landmark sheets.
- cd to your CogRob directory and make a lab3 directory inside it.
- Download the file Lab3a.py and put it in
your lab3 directory. Take a minute to read the file.
- Set up the first landmark sheet so that landmarks 3 and 4 are
directly ahead of the robot, at a distance of 160 mm (6.29 inches)
measuring from the midpoint. Fold the sheet at the bottom and use masking
tape to secure it to the table.
- Set up the second landmark sheet perpendicular to the first one
so that landmarks 1 and 2 are running along the robot's left side,
about 160 mm to the left of the midline.
- Open a shell on your laptop, activate your venv, cd to your lab3 directory, and type "simple_cli".
- Do runfsm('Lab3a') to begin the lab.
- The program automatically brings up the particle viewer. To do
this manually, you can type "show particle_viewer". Notice that the
particles are initially distributed randomly.
- Type "show landmarks" to see the landmarks we've pre-defined in Lab3a.
- Type "show pose" to see the robot's initial position estimates.
The odometry pose should start with the robot at (0, 0) with heading
0 degrees. The initial particle filter pose, being the weighted
mean of all the particles, will be random.
- Type "show particle 0" to show the first particle. You can use any
number from 0 to 499.
II. Localization Using Just Distance Features
- The particle filter implementation we're using is based
on these
lecture slides. You may find it helpful to review them if you want to
understand the code in more detail.
- Place an object (an orange barrel, or your hand)
in front of marker 3 so that the robot can only see marker 4.
- Lab3a sets up a particle filter that evaluates the particles based
on their predictions about the distances to landmarks. For a
single landmark, if we know only its sensor-reported
distance z, then p(x|z) forms an arc of
radius z. (We're pretending that the robot can see in all
directions, so knowing a landmark's distance doesn't tell us anything
about its bearing or our own heading.)
- The particle filter viewer accepts keyboard commands. Press "z"
to randomize the particles, then press "e" to ask the sensor model to
evaluate the particles based on the current sensor information and
adjust their weights. Then press "r" to resample based on the
particle weights. Do this several times.
Q1: What do you see in these experiments? Take a screenshot of
the result.
- With two landmarks visible we can narrow down our location a bit,
but it helps if the landmarks are widely separated. Landmarks 3 and 4
are not that well separated, but they're good enough. Unblock
landmark 3 so the robot can see both, and press "z" and "r" some more
to observe the effect.
- The yellow triangle shows the robot's location and heading, and
the blue wedge shows the variance in the position and heading
estimate. The robot has no way to determine its heading from distance
data alone. So even though its location estimate converges quickly,
it still has no clue as to the heading. The particles in the display
are all at roughly the correct distance, but they have random
headings. Take a screenshot to illustrate this. You may need to zoom
in using the < key to see the individual particles clearly.
Q2: Calculate
and write down the mean and variance of the x values of the
particles in this state. Do the same for the theta values. You can get the x
values of the particles with the following expression:
x = [p.x for p in robot.particle_filter.particles]
- What action does the robot need to take to narrow down its
heading estimate?
III. Localization Using Distance Plus Motion
- Put the robot back at its starting position. Block landmark 3
again, so the robot only sees landmark 4. Clear the world map by
typing
robot.world_map.clear(). Randomize the particles,
and press the "r" key a bunch of times. Note that the particle
headings are random.
- The particle viewer uses the w/s keys to drive the robot forward and
backward. Drive forward and then backward and observe what
happens to the particles. Although the particles still cover a broad
arc, they are now all pointing toward the landmark. This is because
particles whose headings were inconsistent with the robot's motion
earned low weights, and were eventually replaced by the resampling
algorithm. Now the robot's's estimated heading, being the weighted
average of the particles, is closer to the true heading.
- Uncover landmark 3 so the robot can see both landmarks 3 and 4.
What effect does the availability of a second landmark have on
localization?
- The particle viewer uses the a/d keys to turn left or right by
22.5o; it use A/D to turn by 90o. Turn to view
the landmarks 1 and 2, move toward or away from them, then turn back
to landmarks 3 and 4, and so on. This provides more information to
the sensor model and allows the particle filter to better discriminate
among particles. What do you observe the particles doing when the
robot moves this way?
IV. A Bearing-Based Sensor Model
- Lab3a.py uses a class called ArucoDistanceSensorModel to weight
particles. It's defined in aim_fsm/particle.py. Take a look at it.
Instead of distances, we could use choose to use bearings to
landmarks.
- Download the variant program Lab3b.py that
uses ArucoBearingSensorModel instead. When only a single landmark is
visible, the distance model distributes particles in an arc around the
landmark, but the bearing model provides no position constraint. It
simply forces all the particles to point toward the landmark. How big
a difference does it make to have multiple landmarks in view? Let the
robot see both landmarks 3 and 4, and hold down the "r" key for a
while.
V. A Combination Distance and Bearing Sensor Model
- We can combine distance and bearing information to have the best
features of both. Download the third variant
program, Lab3c.py, that uses
ArucoCombinedSensorModel.
- Q3: How does the particle filter behave now?
- Drive the robot around using the wasd keys but keep it facing
away from the landmarks so it cannot correct for odometry error.
Q4: What do you observe about the particle cloud as the robot
continues to drive around?
VI. Programming Problems (Homework; Do By Yourself)
- Write a FindClosestBarrel node that computes the distance from
the robot to each barrel and finds the barrel that is closest. It
should broadcast that barrel using a DataEvent. If the robot doesn
not see any barrels, the node should post a failure event. The
built-in TurnToward node that can receive the DataEvent and make the
robot turn to face the object. Put everything together in a state
machine program called TurnToClosest.fsm. If the
FindClosestBarrel node posts a failure instead of posting a data
event, make the robot say something to complain and then return to
looking for barrels.
- TwoMarkers challenge: the vex-aim-tools particle filter
treats landmarks as points, so if the robot sees only a single ArUco
marker it cannot fully localize itself because it lacks heading
information. If it travels a bit and then spots another marker, the
particle cloud should then collapse to a single tight cluster.
Construct an illustration of this in a program called TwoMarkers.fsm
by configuring some physical landmarks and writing code to look at
one landmark, turn left 90 degrees and travel a bit, then turn left
90 degrees again and look at the second landmark. (Note that you
will have to work out the landmark positions and distances in
advance and declare the two landmark positions using code similar to
what's in Lab3c.py.) Can the robot figure out where it is? Document
your program's behavior with screenshots.
- How much confidence should the robot have in its position estimate?
The estimate is the weighted average of all the particle positions.
When the particles are clustered tightly together, confidence should
be high. When they are spread out, confidence should be low. Type
"show particle 5" in simple_cli to examine a random particle. You
can access all the particles at
robot.particle_filter.particles.
Write a program Confidence that measures the variance of the
particle positions (i.e., the variance in distance from the mean)
and announces one of "I'm lost", "I have low confidence", or "I have
high confidence", depending on the variance. You can determine the
appropriate thresholds. It should be set up as a loop so that every
time the user types a "tm" command in simple_cli, the robot speaks
its current confidence level. Then you can drive the robot around
with the particle viewer and type "tm" to have the robot narrate its
journey. Use a similar landmark setup as either Lab3c.py or
TwoMarkers.
- Celeste can capture images from the
robot's camera and send them to GPT-4o. Pick some objects the robot
can easily spot with its camera, such as keys, a large binder clip,
a candy bar, or a pen cap. Develop a prompt that will allow you to
ask Celeste if she sees a particular object in her camera image and
drive toward it if she does, e.g., you should be able to say "drive
toward the pen cap". Don't hard-code specific objects; your program
should not make assumptions about the objects you'll be asking
about. Call your program Object_test.
- Celeste uses the SendGPTCamera and AskGPT nodes to invoke GPT-4o.
Write your own simple state machine program ThumbsUp that
uses these nodes to determine whether a hand is making a thumbs-up
gesture or not. If it sees thumbs-up in the current camera image it
should play the "tada" sound (see
AIM_Websocket_Library/vex/vex_types.py) using a PlaySound node.
Have it loop so it can respond repeatedly. Note: do not use the
Celeste chatbot program structure for this problem. Write a simple
state machine that just uses the SendGPTCamera and AskGPT nodes to
query GPT-4o, and examine the result received from AskGPT to
determine whether the thumbs-up was detected.
Hand In
Collect the following into a zip file:
- Your answers to questions Q1 to Q4.
- The snapshots you took during the lab, with file names that make
it clear which image goes with which question.
- The name of your partner if you did the lab activity as a team of 2.
- The code you wrote (by yourself) for the programming problems,
plus the screenshots you took when running your TwoMarkers solution.
Hand in your work through Canvas by next Friday.
|