15-494/694 Cognitive Robotics: Lab 5
I. Software Update and Initial Setup
At the beginning of every lab you should update your copy of
vex-aim-tools. To do this:
$ cd vex-aim-tools
$ git pull
If you've made changes to files in vex-aim-tools that you want to
keep, you can temporarily save your changes by doing "git stash",
and then, after the "git pull", you can do "git stash pop" to restore
the changes.
If you've made changes to files in vex-aim-tools that you do not
want to keep, such as to aim_kin.py, you can reset the file by
doing "git checkout aim_fsm/aim_kin.py" before doing the "git pull".
II. Adjust Camera Tilt
If you're using the same robot as last week, make sure the value of
camera_angle in aim_kin.py is your measured value. If you're using a
different robot, measure the angle yourself.
III. Experiment with Simultaneous Localization and Mapping
You can do this in a team of 2 people if you like.
This lab's setup differs from Lab 3: it uses the default
SLAMParticleFilter class instead of the simpler ParticleFilter.
You'll notice that when the robot is picked up and put down,
it will not reset its particle filter to a pose of (0,0) if there is
at least one known landmark in the world. Instead, it "delocalizes" and, as
it drives around, looks for landmarks that it can use to localize
again. As you maneuver the robot around using the particle viewer
keyboard commands (type 'h' in the particle viewer for a list of
commands) you will see the particle cloud collapse when the robot
spots a familiar landmark.
- Create a lab5 folder and download the
file Lab5a.py into it. Read the file to see
what it's doing.
- Lay out the Tag 1/2 and Tag
3/4 sheets the same way you did
for Lab 3.
- From your lab5 directory, do "simple_cli Lab5a". If this doesn't
work for you, then you haven't set up your profile correctly; check
the updated instructions from Lab 1. For now, you can just use
runfsm('Lab5a') instead.
- Drive the robot around with the particle viewer and observe how
it adds Aruco markers as landmarks in the map. As it continues to collect
sensor readings, the uncertainty in the landmark poses will get smaller.
- In the particle viewer you can use the "l" command to show the
landmarks the particle filter is using, along with their
uncertainties. Also "p" will show the robot's current pose.
- Using the particle viewer, turn the robot so it can't see any
landmarks and drive forward a bit. In simple_cli, type "show particle
5" and then "show particle 23". Notice that each particle maintains
its own estimate of the landmark positions. These are updated using
the Extended Kalman Filter mentioned in Claus Brenner's video course.
- Use your hand to block the robot's view of the landmarks, and
pick up the robot. Put it down in a direction where it isn't facing
any landmarks. Note that the particles get randomized. Type "p" in
the particle viewer and you'll see that the robot's state is "[lost]".
- This is the "kidnapped robot problem". The robot needs to find
familiar landmarks to figure out where it is. But at the same time
it's trying to figure out where the landmarks are; this is the SLAM
problem. Use the particle viewer to turn the robot until it sees some
landmarks. What do the particles do?
- Repeat these experiments, this time taking screenshots and making
notes of what you observe. You will hand in this illustrated
experiment log as part of of your assignment in Canvas.
IV. Walls
- Lab5b.py introduces walls, which are
defined by Aruco markers. Walls, not Aruco markers, are the default
landmark type used by vex-aim-tools. Download the file and read it.
- Take the simple_doorway.pdf
printout and measure the positions of the centers of the markers and
the doorway relative to the left edge of the page. Compare your
measurements to the numbers in the Lab5b file.
- Cut out the rectangle for the doorway opening and fold the sheet
along the dashed line. Tape the sheet to the table; you might need to
tape in some support to keep the sheet stiff and upright.
- Position the robot so it can see the entire wall, and run Lab5b.
Drive the robot around so it can update its estimate of the wall as a
landmark.
- In the particle viewer, type "l" to show the wall landmark. Type "p"
to show the robot's pose.
- Using your hand to cover the camera, gently slide the robot 100
mm (4 inches) to the right, so it doesn't realize you're moving it.
Uncover the camera, and use the particle viewer to turn the robot so
it can see the Aruco markers. Did the robot update its position
correctly, or is it slow to correct the error?
- Type capital "Z" in the particle viewer a half dozen times to
jitter the particles. Drive the robot around and see if its position
estimate improves.
- What the particle filter should really be doing is monitoring
how well the best particle fits the landmarks sensor readings. If
the fit isn't great, it should increase the variance of the
particles to try to find a better fit. We may implement this
later.
V. Driving Through a Doorway
You can do this in a team of 2 people if you like.
- The doorway has an Aruco marker on either side of it. Thus, you
can drive through the doorway by positioning the robot so it is
equidistant from the two Aruco markers.
- Position the robot so that it can see the whole wall, start a
fresh simple_cli and run Lab5b.py.
- Type DoorPass('Doorway-5:0.a').now() and see if the robot can drive
through the doorway.
- Write a state machine program called ThroughTheDoor.fsm
that waits for a doorway to become visible in the world map, and then
drives the robot through the doorway. Your code should work for any
doorway. If you run this program with the robot starting out not
seeing a wall, you can drive the robot with the particle filter and
then your code can automatically take over once a doorway is
found.
VI. Homework Problem: Teach Celeste to Play Nim
This part must be done on your own, not in teams.
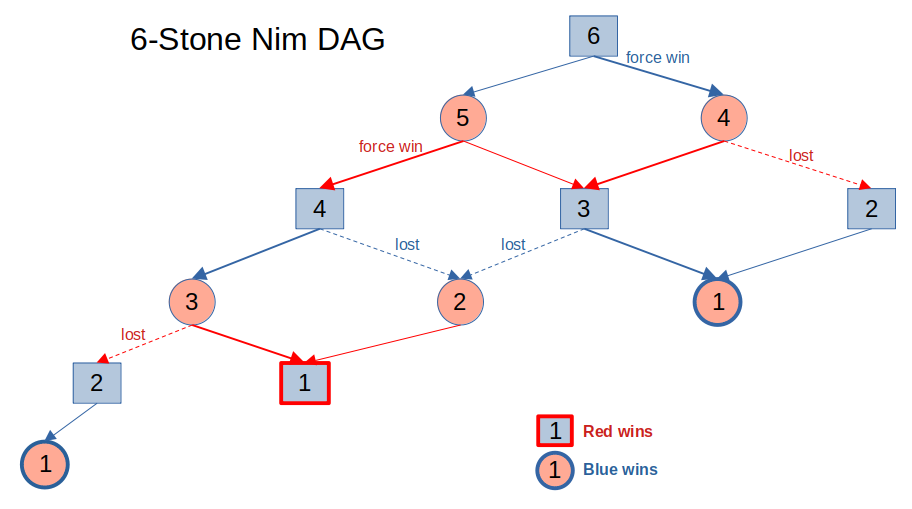
Nim is a centuries-old, simple game with many variations. You start
with a pile of stones, typically 11 or 21 but it can be any number.
Players take turns removing stones from the pile. In our version, a
player can take either 1 or 2 stones for each move. The player who
takes the last stone loses.
We're going to teach Celeste to play a minimal version of Nim wth six
"stones" represented by the blue and orange barrels. (Here, color
doesn't matter.) The barrels are initially arranged in a line, with
the robot on one side of the line and the human player on the other
side.
To "take away" a stone, Celeste will pick up a barrel, carry it
further behind the line, and drop it there. Then Celeste will return
to the line, so any removed stones will be behind her and out of view.
You can use the PickUp() and Drop() nodes for this, or the already
built-in Celeste behaviors.
You can use a mix of Python code and GPT-4o to turn Celeste into a
friendly, engaging Nim player. You can rely on the human to set up
the initial game state. You'll want to negotiate who goes first, and
you'll want Celeste to say appropriate things when someone wins or
loses.
Strategy: It would be a good idea to break this down into two
separate problems: (1) playing the game using just verbal
interactions to describe the moves, and (2)
physical manipulation where you navigate around the playing
field and move barrels as needed. Once you have solved both of these
problems, you can integrate your solutions to produce a fully
functioning Nim robot.
|
|
Click image for larger version |
You are free to use Celeste.fsm as a starting framework, but you're not
required to do so. You are free to add more #hashtag directives if
you think they'll be useful actions for playing the game. Do whatever
works well for you. We're looking forward to seeing the creativity
shown in your solutions.
What to Hand In
Hand in a zip file containing the following:
- A PDF file (not DOCX or RTF) with your narrative and
screenshots describing the experimentation you did in parts III and IV.
- Your ThroughTheDoor.fsm file from part V.
- Your Nim program from part VI.
If you did parts of the lab (not the homework) with a team mate, list
that person's name in your handin.
|